MAYA银版教程_Maya视频教程
视频Tag:暂无Tag,欢迎添加,赚取U币!
此教程来源于9iv.
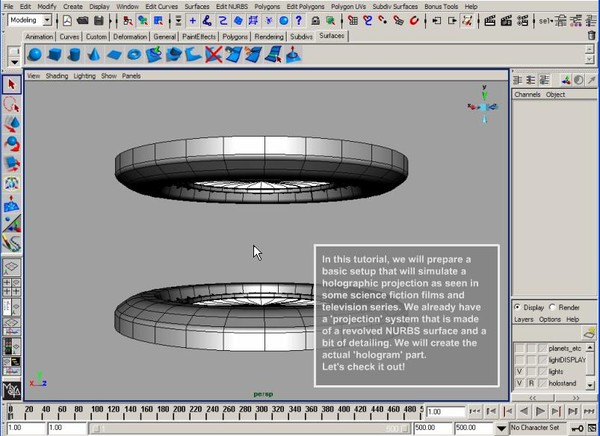
MAYA银版教程,swf格式,本期教程主要讲解全息图显示(HOLOGRAM DISPLAY)的制作。
通过本教程的学习,你将清楚在计算机上是怎样完成像科幻小说那些奇幻的炫丽场景。
3张CD的教程里你将完整的学习到从建模、材质到动画内容,教学采用高质量截屏,swf格式。
Contents:
CD1:
INTRODUCTION
No doubt you have seen the flashy, futuristic effects on popular
Science-Fiction television series or Blockbuster films.
Now you can create your own hologram generator and hologram projections
using just a simple scene setup.
STEP 1
We will start by creating some of the shapes that will make up
the hologram display. We will be primarily using NURBS spheres and cylinders
and then detaching the surfaces to create the desired shapes.
STEP 2
After the shapes have been created, we will examine the tessellation
settings and correct them accordingly for improved rendering results.
hen we will proceed with creating the outlines of the shapes by extracting
curve information from the surfaces. We will take these curves and attach
Paint Effects glow strokes to simulate the laser/neon light-up effect
of a holographic display.
STEP 3
We will re-examine the curves created from the surfaces and correct
any anomalies that have occurred. Then we will re-attach the Paint Effects
neon glow stroke to the curve. The surfaces created in Part 1 will then be
deleted and we will activate a layer with previously made surfaces
that will simulate some of the holographic projections.
STEP 4
We will apply the same techniques covered earlier when applying Paint Effects
brush strokes to the curves from these surfaces.
CONCLUSION
You may be accustomed to seeing these holographic displays project flying,
random information and visuals - these effects are composited afterwards.
We will be covering the actual 3D construction aspect of it. Stay tuned
next time when we apply textures to the surfaces and create additional
geometry for the holographic projections.
CD2:
INTRODUCTION
This is the part-two continuation of the Light-up Hologram Display tutorial.
In it, we will create and apply shaders that will mimic the look of
a holographic image from the surfaces we created previously.
STEP 1
Using lambert shaders, we will turn the surfaces into transparent and
glowing 'light displays'. We will also use the Sampler Info utility to
alter translucency values of the surfaces depending on the angle
view of camera.
STEP 2
We will add additional geometry to the 'hologram display'.
STEP 3
We will add additional geometry to the 'hologram display'.
CONCLUSION
Stay tuned next time when we texture the rest of the hologram display
in preparation for the animation!
CD3:
INTRODUCTION
This is the last installment of the Light-up Hologram Display tutorial.
We will be animating the geometries in the scene to simulate a moving hologram projection image and creating shaders for the remaining surfaces inside the s
STEP 1
Let's check the movements of the moonpath/rings around the planets.
STEP 2
We will prepare shaders for the hologram planets. Thanks to J.H.T.'s
Planetary Pixel Emporium [http://gw.marketingden.com/planets/sun.html]
for the images to texture the planets with!
STEP 3
We will create glowing, colourful procedural shaders for the moonpath/rings.
STEP 4
We will create glowing, colourful procedural shaders for the moonpath/rings.
STEP 5
We will create a shader for the giant ring around the hologram.
STEP 6
Now we will prepare the scene and animate the moonpath/rings.
STEP 7
We will animate the moonpath/rings.
STEP 8
We will prepare the giant ring for rendering and animating.
STEP 9
We will finish animating the giant ring and render out to see the
final results. In addition, we will throw in two lights
to brighten up the scene.
STEP 10
As a final touch, we will create a 'laser scan' on the main planet using
a curve-on-surface and a neon Paint Effects brush.
CONCLUSION
Now you probably have an idea how those cool computer displays that
light up neon bright are done in movies. You now have the know-how
to make your own sci-fi flicks! - at the very least...
the bright and moving displays on computer consoles.
[已通过安全检测]SYMANTEC.ANTIVIRUS.CORPORATE.V10.0.
[已通过安装测试] win xp
共享服务时间:8:00-12:00
共享服务器:DonkeyServer No1-3 . DonkeyServer No5
相关Maya视频教程:
- 相关链接:
- 模板说明:
Maya视频教程-MAYA银版教程
 。
。