用Xaml做网页框架(4)_.Net教程
推荐:校内网API的.net版本XiaoNei.Net 1.0(非官方)校内API开放也有一段时间了,也没有太关注,正好新版本的SNS开发到了API这一块,正好借鉴一下XiaoNei,FB,MySpace的API。 且闻校内API比较有前途,最近的API编程大赛也比较火,而且人气也较
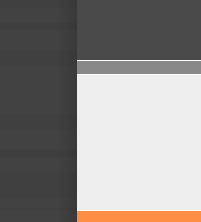
下面两图分别是设计效果和实际效果:
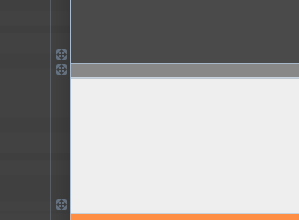
至此我们完成了基本的框架设计,现在设计视图中的效果如下:
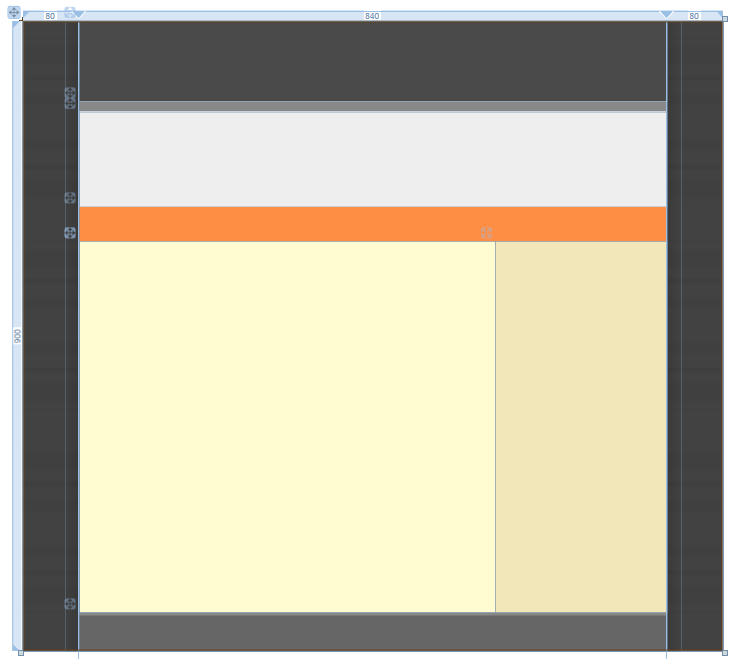
到目前为止的全部代码:
| 以下为引用的内容: <Page xmlns="http://schemas.microsoft.com/winfx/2006/xaml/presentation" xmlns:x="http://schemas.microsoft.com/winfx/2006/xaml" WindowTitle="MailMail" FontFamily="微软雅黑" Background="#FF424242" SnapsToDevicePixels="True"> <Page.Resources> <ResourceDictionary> <ResourceDictionary.MergedDictionaries> <ResourceDictionary Source="back.xaml"/> </ResourceDictionary.MergedDictionaries> </ResourceDictionary> </Page.Resources> <ScrollViewer HorizontalScrollBarVisibility="Auto" VerticalScrollBarVisibility="Auto"> <Grid MinHeight="900" MinWidth="1000" Background="{StaticResource back}"> <Grid.ColumnDefinitions> <ColumnDefinition Width="8*"/> <ColumnDefinition Width="84*"/> <ColumnDefinition Width="8*"/> </Grid.ColumnDefinitions> <Rectangle Width="20" Grid.Column="0" HorizontalAlignment="Right" Margin="0,0,0,0"> <Rectangle.Fill> <LinearGradientBrush StartPoint="1,0" EndPoint="0,0"> <GradientStop Color="#00000000" Offset="1" /> <GradientStop Color="#20000000" Offset="0" /> </LinearGradientBrush> </Rectangle.Fill> </Rectangle> <Rectangle Width="20" Grid.Column="3" HorizontalAlignment="Left" Margin="0,0,0,0"> <Rectangle.Fill> <LinearGradientBrush StartPoint="1,0" EndPoint="0,0"> <GradientStop Color="#00000000" Offset="0" /> <GradientStop Color="#20000000" Offset="1" /> </LinearGradientBrush> </Rectangle.Fill> </Rectangle> <DockPanel Background="#FFF" Grid.Column="1"> <DockPanel x:Name="Head" DockPanel.Dock="Top" Background="#FF4A4A4A" Height="115"></DockPanel> <Border x:Name="HeadLine" Background="#888" BorderThickness="0,1" DockPanel.Dock="Top" Height="15"></Border> <Grid x:Name="Show" Background="#EEE" DockPanel.Dock="Top" Height="135" ClipToBounds="True"></Grid> <Border x:Name="Channel" DockPanel.Dock="Top" Height="50" Background="#FF8E45" BorderThickness="0,1,0,0" BorderBrush="#FFF"></Border> <Border x:Name="Footer" Background="#666" BorderBrush="#888" BorderThickness="0,4,0,0" DockPanel.Dock="Bottom" Height="55"></Border> <DockPanel x:Name="Body" Background="#FFFFFCD1"> <DockPanel x:Name="Side" Background="#1E874900" DockPanel.Dock="Right" Width="245"></DockPanel> <StackPanel x:Name="Content"></StackPanel> </DockPanel> </DockPanel> </Grid> </ScrollViewer> </Page> |
本篇至此结束,在后续的篇章中将继续讲解页面主体中各个区块的制作。
文中如有不妥的地方,欢迎随时指正,我不介意听到异议,分歧是交流和进步的开始,我也有太多东西需要向各位学习:)
分享:Asp.net Mvc Framework可以在Controller中使用的Url.Action方法原本的Url.Action方法是利用RouteCollection来实现Url的Routing的。 所以这里用一个扩展方法重现一下 以下为引用的内容:
- asp.net如何得到GRIDVIEW中某行某列值的方法
- .net SMTP发送Email实例(可带附件)
- js实现广告漂浮效果的小例子
- asp.net Repeater 数据绑定的具体实现
- Asp.Net 无刷新文件上传并显示进度条的实现方法及思路
- Asp.net获取客户端IP常见代码存在的伪造IP问题探讨
- VS2010 水晶报表的使用方法
- ASP.NET中操作SQL数据库(连接字符串的配置及获取)
- asp.net页面传值测试实例代码
- DataGridView - DataGridViewCheckBoxCell的使用介绍
- asp.net中javascript的引用(直接引入和间接引入)
- 三层+存储过程实现分页示例代码
- 相关链接:
- 教程说明:
.Net教程-用Xaml做网页框架(4)
 。
。