怎样用DHTML与XML制作Ajax幻灯片_AJAX教程
推荐:怎样处理书签和后退按钮本文将展示一个开源JavaScript库,该脚本库给AJAX应用程序带来了书签和后退按钮支持。在学习完这个教程后,开发人员将能够获得对一个AJAX问题的解决方案(甚至连Google Maps和Gmail现在都不提供该解决方案):一个强大的、可用的书签和后退前进功能,其操作行
Ajax 幻灯片放映
个人图像管理应用程序(如 Macintosh® 上的 Apple® iPhoto®)使得幻灯片浏览广为人知。在幻灯片浏览中,图像按照时间顺序先后淡入淡出。此外,图片还通过所谓的 “Ken Burns Effect” 进行移动和缩放。
在该例中,我让浏览器从服务器上下载一个图像列表。然后使用动态 HTML(DHTML)把图片列表组成一个幻灯片。我使用随机的缓慢移动、缩放和渐变来改变图片,实现了令人满意的 Ken Burns Effect 版本,而不需要下载 Macromedia® Flash 或其他重量级的动画工具。
体系结构
要了解 Ajax 有何不同,首先必须理解当前的 Web 编程模型。客户机和服务器之间的简单交互如 图 1 所示。
图 1. 客户机-服务器交互的 Web V1.0 模型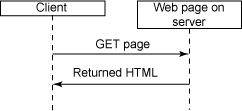
Web 浏览器或者客户机 向 Web 服务器发出 GET 或 POST 请求。服务器格式化 HTML 响应。客户机解析 HTML 并显示给用户。如果用户单击其他链接和按钮,就向服务器发出另一个请求,用服务器返回的新页面替换当前页面。
新模型具有更多的异步特色,如 图 2 所示。
图 2. 客户机-服务器交互的 Ajax 模型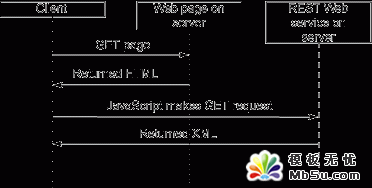
在新的模型中,和以前一样,服务器也返回 HTML 页面。但是这个页面中有一些 JavaScript 代码。在需要的时候,这些代码向服务器请求更多信息。这些请求可以是简单的 GET 请求(Representational State Transfer (REST) 服务)或者 POST 请求(SOAP)。
然后,JavaScript 代码解析响应(通常用 XML 编码)并动态更新页面以反映新的数据。除了 XML 外,还返回 JavaScript Serialized Object Notation(JSON)格式编码的数据。浏览器很容易理解这类数据,但其他类型的客户机则不行。返回 XML 的意义在于浏览器之外的其他客户机也能解释数据。选择由您来决定并依赖于具体的应用程序。
开发 Ajax 幻灯片的第一步是结合 REST 数据服务。该例中使用 PHP 页面返回所有可用的幻灯片图像及其大小(宽和高)。所有图像都放在 images 目录中。文件名格式为 name_width_height.jpg,比如 oso1_768_700.jpg 表示该文件是我的狗 Oso 的照片,宽 768 像素,高 700 像素。我坚持使用这种命名方式,因为这样就很容易确定图片的宽和高,而不用费力去打开 Adobe® PhotoShop® 或 Macromedia Fireworks。
我使用 清单 1 所示的 PHP 服务器代码来提供图片列表。
清单 1. slides.php 服务器页面
<?php
header( "Content-type: text/xml" );
?>
<slides>
<?php
if (handle = opendir('images')) {
while (false !== (file = readdir(handle)))
{
if ( preg_match( "/[.]jpg/", file ) ) {
preg_match( "/_(\d+)_(\d+)[.]/", file, found );
?>
<slide src="images/<?php echo file; ?>"
width="<?php echo found[1]; ?>"
height="<?php echo found[2]; ?>" /><?php echo( "\n" ); ?>
<?php
}
}
closedir(handle);
}
?>
</slides>
代码很简单。首先将内容类型设置为 XML。让浏览器将该文档识别为 XML 并为其创建文档对象模型(DOM)至关重要。代码从 <slides> 标记开始,然后读取图片目录并为遇到的每个图片创建 <slide> 标记。最后脚本结束 <slides> 标记。
如果用 Mozilla® Firefox® 浏览器打开(在我的机器上)本地主机 kenburns 目录中的该页面,就会看到 图 3 所示的结果。
图 3. slides.php 服务器脚本的输出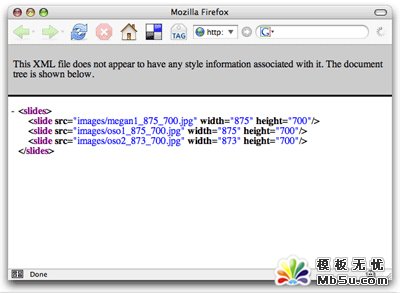
一共三幅图片:我的女儿和我的两条狗。当然在这里可以增加任何需要的细节或者多媒体,但我尽量保持例子的简单性。
检索 XML
下一步就是编写一个 HTML 页面(如 清单 2 所示)从服务器读取数据并检验浏览器和服务器之间使用的 Ajax 连接。这段 HTML 代码包含内嵌的 JavaScript 代码,检索 XML 并打开一个警告窗口显示服务器返回的文本。
清单 2. 简单的 Ajax 读取数据页面
<html>
<body>
<script>
function processReqChange()
{
if (req.readyState == 4 && req.status == 200 && req.responseXML != null)
{
alert( req.responseText );
}
}
function loadXMLDoc( url )
{
req = false;
if(window.XMLHttpRequest) {
try {
req = new XMLHttpRequest();
} catch(e) {
req = false;
}
}
else if(window.ActiveXObject)
{
try {
req = new ActiveXObject("Msxml2.XMLHTTP");
} catch(e) {
try {
req = new ActiveXObject("Microsoft.XMLHTTP");
} catch(e) {
req = false;
}
}
}
if(req) {
req.onreadystatechange = processReqChange;
req.open("GET", url, true);
req.send("");
}
}
loadXMLDoc( "http://localhost/kenburns/slides.php" );
</script>
</body>
</html>
代码从指定的 URL 获取 XML 内容,然后 loadXMLDoc 函数启动 Ajax 请求。检索页面的请求异步发出并返回结果。请求完成后,对结果调用 processReqChange 函数。这里用 processReqChange 函数在警告窗口中显示 responseText 的函数值。在我的 Firefox 浏览器中调用该页面的结果如 图 4 所示。
图 4. 在警告窗口中显示的 XML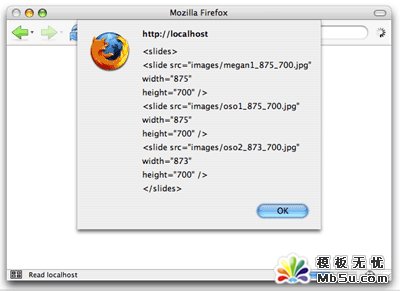
开局不错。毫无疑问,我们从服务器取回了 XML 数据。但是有必要指出几点。首先要注意 URL 使用了绝对路径,包括域名等等。对于 Ajax 来说这是唯一有效的 URL 格式。编写 Ajax JavaScript 代码的服务器代码总是创建有效的、完整格式的 URL。
这里不那么明显的另一点是 Ajax 的安全保护措施。JavaScript 代码不能请求任意的 URL。URL 的域名必须和该页面相同。在这里域名就是 localhost。但必须指出不能呈现 www.mycompany.com 的 HTML 但却让脚本从 data.mycompany.com 检索数据。域必须完全相同,包括子域名。
有趣的另一点是 loadXMLDoc 中的代码,似乎是费力地创建一个请求对象。为何这么麻烦呢?Internet Explorer 7 的预览版没有内建 XMLHTTPRequest 对象类型。因此必须使用 Microsoft ActiveX® 控件。
最后在 processReqChange 函数中,可以看到我在查看 readyState 是否等于 4,status 是否设为 200。readyState 的值 4 表示事务已经完成。status 的值 200 表示页面是有效的。如果没有找到页面,就可能会得到错误消息 404,就像您在浏览器中看到的那样。这里没有处理异常情况,因为这仅仅是一个例子,不过发布的 Ajax 代码应该处理返回错误的请求。
动态创建 HTML
在说明如何创建幻灯片放映之前,首先扩展现在的例子,让 processReqChange 函数用服务器返回的 XML 请求结果创建一个 HTML 表格。这样做可以验证两件事:能够读取 XML 并能够根据 XML 动态创建 HTML。
清单 3 显示了修改后的代码,它将从返回的 XML 创建表格。
清单 3. 改进的测试页面
<html>
<body>
<table>
<tbody id="dataTable">
</tbody>
</table>
<script>
function processReqChange()
{
if (req.readyState == 4 && req.status == 200 && req.responseXML != null)
{
var dto = document.getElementById( 'dataTable' );
var items = [];
var nl = req.responseXML.getElementsByTagName( 'slide' );
for( var i = 0; i < nl.length; i++ )
{
var nli = nl.item( i );
var src = nli.getAttribute( 'src' ).toString();
var width = parseInt( nli.getAttribute( 'width' ).toString() );
var height = parseInt( nli.getAttribute( 'height' ).toString() );
var trNode = document.createElement( 'tr' );
var srcNode = document.createElement( 'td' );
srcNode.innerHTML = src;
trNode.appendChild( srcNode );
var widthNode = document.createElement( 'td' );
widthNode.innerHTML = width.toString();
trNode.appendChild( widthNode );
var heightNode = document.createElement( 'td' );
heightNode.innerHTML = height.toString();
trNode.appendChild( heightNode );
dto.appendChild( trNode );
}
load_slides( items );
start_slides();
}
}
function loadXMLDoc( url )
{
req = false;
if(window.XMLHttpRequest) {
try {
req = new XMLHttpRequest();
} catch(e) {
req = false;
}
}
else if(window.ActiveXObject)
{
try {
req = new ActiveXObject("Msxml2.XMLHTTP");
} catch(e) {
try {
req = new ActiveXObject("Microsoft.XMLHTTP");
} catch(e) {
req = false;
}
}
}
if(req) {
req.onreadystatechange = processReqChange;
req.open("GET", url, true);
req.send("");
}
}
loadXMLDoc( "http://localhost/kenburns/slides.php" );
</script>
</body>
</html>
在浏览器中打开该页面将显示 图 5 所示的结果。
图 5. 修改后的测试页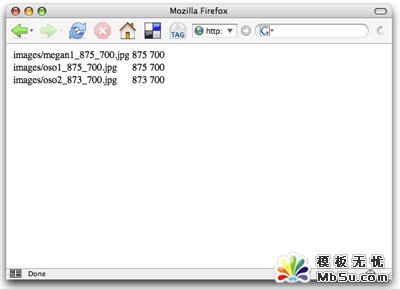
修改后的 processReqChange 代码现在查看 responseXML 对象而不是 responseText 文本。此外,它还使用 getElementsByTagName 访问所有的 <slide> 标记。然后解析 src、width 和 height 属性,并使用 document 对象的 createElement 方法创建行和单元格来存放数据。该方法使用的 createElement 远比过去的老方法健壮,原来要建立一个包含表格内容的 HTML 字符串,然后用 innerHTML 将数据添加到已有的元素中。
创建幻灯片放映
现在已经有了能够确定幻灯片中图像的 Web 服务,还需要显示这些幻灯片并执行 Ken-Burns-Effect 动画的客户端代码。为此必须将执行三种基本功能的 JavaScript 对象结合起来:
1、封装图像
2、提供基本的动画引擎
3、实现特效(比如移动、缩放和渐变)
封装图像
首先从图像容器开始,我创建一个类 ImageInfo,如 清单 4 所示。
清单 4. ImageInfo.js
function ImageInfo( src, width, height, htmlObj )
{
this.src = src;
this.width = width;
this.height = height;
this.current_width = width;
this.current_height = height;
this.htmlObj = htmlObj;
this.htmlObj.src = this.src;
this.htmlObj.width = this.current_width;
this.htmlObj.height = this.current_height;
}
ImageInfo.prototype.set_opacity = function( opacity )
{
this.htmlObj.style.MozOpacity = opacity / 100;
var f = 'progid:DXImageTransform.Microsoft.Alpha(opacity='+opacity+')';
this.htmlObj.style.filter = f;
}
ImageInfo.prototype.set_position = function( x, y )
{
this.htmlObj.style.left = x+'px';
this.htmlObj.style.top = y+'px';
}
ImageInfo.prototype.set_size = function( w, h )
{
this.current_width = w;
this.current_height = h;
this.htmlObj.width = this.current_width;
this.htmlObj.height = this.current_height;
}
ImageInfo.prototype.get_image = function()
{
return this.htmlObj;
}
ImageInfo.prototype.hide = function()
{
this.htmlObj.style.visibility = 'hidden';
}
ImageInfo.prototype.show = function()
{
this.htmlObj.style.visibility = 'visible';
}
幻灯片中每幅图片都有一个对应的 ImageInfo 对象。该对象封装了图像信息:src、width 和 height。该对象还包含对在文档中显示图像的 HTML <img> 标记的引用,以及移动图像、设置透明度等的 helper 方法。注意,在 Firefox 和其他基于 Gecko® 的浏览器中,MozOpacity 样式用于设置不透明性。Internet Explorer 中则使用过滤器效果。
创建简单的动画引擎
下面我们来编写一个简单的动画引擎。Animation.js 文件中的代码如 清单 5 所示。
清单 5. Animation.js
function Animation( am, img, seconds, effects )
{
this.img = img;
this.animationManager = am;
this.seconds = seconds;
this.effects = effects;
this.startMS = 0;
}
Animation.prototype.start = function()
{
this.animationManager.add( this );
this.startMS = 0;
this.img.hide();
for( var e in this.effects )
{
this.effects[e].apply( 0 );
}
this.img.show();
}
Animation.prototype.animate = function()
{
var d = new Date();
if ( this.startMS == 0 )
this.startMS = d.valueOf();
var p = (((d.valueOf()-this.startMS)/1000)/this.seconds)*100;
for( var e in this.effects )
this.effects[e].apply( p );
}
Animation.prototype.done = function()
{
var d = new Date();
return ( ( d.valueOf() - this.startMS ) / 1000 ) > this.seconds;
}
function AnimationManager( speed )
{
this.animations = [];
var self = this;
window.setInterval( function() { self.idle(); }, speed );
}
AnimationManager.prototype.add = function( anim )
{
this.animations.push( anim );
}
AnimationManager.prototype.idle = function()
{
if ( this.animations.length > 0 )
{
this.animations[0].animate();
if ( this.animations[0].done() )
this.animations.shift();
if ( this.animations.length == 0 )
this.on_finished();
}
}
AnimationManager.prototype.on_finished = function()
{
}
清单 5 包含两个类:Animation 和 AnimationManager。AnimationManager 类控制定时器并向其 Animation 对象列表中的第一项发送动画消息。当 Animation 对象报告自己已经完成的时候,该类就转向下一项,依此类推。
Animation 在一定的时间(按秒数指定)内对特定图片应用一系列特效。Animation 对象需要计算完成度消息并将其发送给每种特效的 apply 方法。特效然后根据这个百分比计算应该如何处理图像。比如,移动特效知道起点和终点,可以根据这个百分比计算应该将图像放到何处。如果是 50%,图像应该移到起点和终点之间。
作为我工作的一部分,同时也为了撰写本文,我考察了大量的 JavaScript 动画代码。JavaScript 动画经常因为不稳定而受到指责,因为所有 JavaScript 动画都使用 window.setInterval 方法来完成。这是一个定时器方法,同时指定了回调时间间隔和回调函数。Web 上的大部分代码都要求每次调用该函数时动画移动一步。但这并不能真正工作,因为告诉浏览器的间隔仅仅是一个建议。如果规定 20 毫秒,但实际上可能第一次在 25 毫秒时调用,下一次却要等到一秒钟以后。浏览器是单线程的,因此不能依赖于定时器。
解决方案是使用 Date 对象的 valueOf 方法确定动画开始了多长时间。这个时间差是用毫秒计的,用于确定当 setInterval 定时器离开时动画应该执行百分之多少。该方法可以提供规定的任意长时间的平滑动画。
执行特效
三个核心类的最后一个是 Ken Burns Effects。这些特效通过 Animation 对象应用于图像,如 清单 6 所示。
清单 6. KenBurnsAnimations.js
function KenBurnsFader( img, windowSize )
{
this.img = img;
this.windowSize = windowSize;
}
KenBurnsFader.prototype.apply = function( percent )
{
var opacity = 100;
if ( percent <= this.windowSize )
opacity = ( percent / this.windowSize ) * 100;
else if ( percent >= ( 100 - this.windowSize ) )
opacity = ( ( 100 - percent ) / this.windowSize ) * 100;
this.img.set_opacity( opacity );
}
function KenBurnsZoomer( img, start, end, cw, ch )
{
this.start = start;
this.end = end;
this.img = img;
var wr = this.img.width / cw;
var nw = this.img.width * wr;
var nh = this.img.height * wr;
this.sw = ( nw * ( this.start / 100 ) );
this.ew = ( nw * ( this.end / 100 ) );
this.sh = ( nh * ( this.start / 100 ) );
this.eh = ( nh * ( this.end / 100 ) );
this.dw = ( this.ew - this.sw ) / 100;
this.dh = ( this.eh - this.sh ) / 100;
}
KenBurnsZoomer.prototype.apply = function( percent )
{
this.img.set_size(
this.sw + ( this.dw * percent ),
this.sh + ( this.dh * percent ) );
}
function KenBurnsMover( img, sx, sy, ex, ey, cw, ch )
{
this.img = img;
this.sx = sx / 100;
this.ex = ex / 100;
this.sy = sy / 100;
this.ey = ey / 100;
this.cw = cw;
this.ch = ch;
this.wr = this.img.width / this.cw;
}
KenBurnsMover.prototype.apply = function( percent )
{
var nw = this.img.current_width * this.wr;
var nh = this.img.current_height * this.wr;
var cntw = ( ( this.cw / 2 ) - ( nw / 2 ) );
var cnth = ( ( this.ch / 2 ) - ( nh / 2 ) );
var sx = ( nw * this.sx );
var ex = ( nw * this.ex );
var sy = ( nh * this.sy );
var ey = ( nh * this.ey );
var dx = ( ex - sx ) / 100;
var dy = ( ey - sy ) / 100;
var x = cntw + sx + ( dx * percent );
var y = cntw + sy + ( dy * percent );
this.img.set_position( x, y );
}
这三个类分别处理应用于图像的不同特效。KenBurnsFader 类使用不透明度处理图像的淡入淡出。KenBurnsZoomer 类处理图像的缩放,从最初的大小到最终的大小。KenBurnsMover 类处理图像的移动,从起点到终点(用图像的百分比指定)。
经过一些试验后,我发现最吸引人的移动特效是相对于窗口中心从一个角移动到另一个角。KenBurnsMover 类的 apply 方法包含一些复杂的数学运算,不仅相对于包含图像的 <div> 标记的中心来移动,还要计算图像和 <div> 标记的相对大小,这样在小窗口中移动的距离就小,在大窗口中移动的距离就大。放大倍数根据窗口的高度确定。
实现非 Ajax DHTML
有了这些基础类之后,就可以实现幻灯片的非 Ajax DHTML 版本来进行测试了,如 清单 7 所示。
清单 7. 非 Ajax 幻灯片放映
<html>
<head>
<style type="text/css">
body { background: black; margin: 0px; padding: 0px; }
</style>
<script src="KenBurnsAnimations.js">
</script>
<script src="Animation.js">
</script>
<script src="ImageInfo.js">
</script>
<script>
var g_animationManager = new AnimationManager( 50 );
var g_current_slide = 0;
var g_slides = [];
var g_directions = [
{ sx: [ -30, 0 ], ex: [ 5, 40 ], sy: [ -30, 0 ], ey: [ 5, 40 ] }, // nw -> se
{ sx: [ 5, 40 ], ex: [ -30, 0 ], sy: [ 5, 40 ], ey: [ -30, 0 ] }, // ne -> sw
{ sx: [ 5, 40 ], ex: [ -30, 0 ], sy: [ 5, 40 ], ey: [ -30, 0 ] }, // se -> nw
{ sx: [ -30, 0 ], ex: [ 5, 40 ], sy: [ 5, 40 ], ey: [ -30, 0 ] } // sw -> ne
];
g_animationManager.on_finished = function()
{
g_current_slide++;
if ( g_current_slide >= g_slides.length )
g_current_slide = 0;
g_slides[ g_current_slide ].start();
}
function rnd( start, end )
{
return ( Math.random() * ( end - start ) ) + start;
}
function load_slides( images )
{
var ic = document.getElementById( 'imgContainer' );
for( var i in images )
{
var img = images[i];
var imgObj = document.createElement( 'img' );
imgObj.style.position = 'absolute';
imgObj.style.left = '0px';
imgObj.style.top = '0px';
imgObj.style.visibility = 'hidden';
ic.appendChild( imgObj );
var ii = new ImageInfo( img.src, img.width, img.height, imgObj );
var szoom = rnd( 50, 100 );
var ezoom = rnd( 70, 120 );
var d = parseInt( ( Math.random() * g_directions.length ).toString() );
var di = g_directions[ d ];
var sx = rnd( di.sx[0], di.sx[1] );
var sy = rnd( di.sy[0], di.sy[1] );
var ex = rnd( di.ex[0], di.ex[1] );
var ey = rnd( di.ey[0], di.ey[1] );
g_slides.push(
new Animation( g_animationManager, ii, 10,
[ new KenBurnsZoomer( ii, szoom, ezoom, ic.clientWidth, ic.clientHeight ),
new KenBurnsMover( ii, sx, sy, ex, ey, ic.clientWidth, ic.clientHeight ),
new KenBurnsFader( ii, 30 ) ] )
);
}
}
function start_slides()
{
g_slides[ g_current_slide ].start();
}
</script>
</head>
<body>
<div style="position:relative;width:100%;height:100%;overflow:hidden;"
id="imgContainer">
</div>
<script>
var images = [
{ src: 'images/megan1_875_700.jpg', width: 875, height: 700 },
{ src: 'images/oso1_875_700.jpg', width: 875, height: 700 },
{ src: 'images/oso2_873_700.jpg', width: 873, height: 700 }
];
load_slides( images );
start_slides();
</script>
</body>
</html>
不用电影是很难说明上述代码在浏览器中的运行结果的。因此我抓了一个快照,如 图 6 所示。
图 6. 幻灯片放映的快照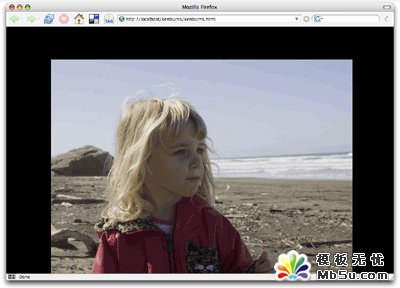
该页面首先通过 <script> 标记的 src 属性引入基类。安装这些类之后,增加两个函数将整个机制组织到一起:load_slides 和 start_slides。load_slides 函数接收一个数组,包括图像的 src、width 和 height,然后创建 <image> 标记和动画。start_slides 函数从第一项开始启动幻灯片放映。
附加在动画管理器上的另一个方法 on_finished 在动画完成时调用。我使用该通知移动到下一张幻灯片,如果已经完成所有幻灯片的动画,则回到列表中的第一张。
再回到 load_slides,要注意它引用了一个名为 g_directions 的数组。该数组包含一些随机范围,幻灯片加载程序用它来规定图片移动的起点和终点。最理想的效果是从一个角到另一个角。从注释中可以看到,这些值规定幻灯片的移动范围为东北、东南、西北和西南的任意组合。最后的 <script> 标记定义了一个图像数组,然后使用 load_slides 和 start_slides 函数启动幻灯片放映。
分享:打造Ajax简单相册演示地址 源文件下载 AJAX(Asynchronous JavaScript And XML)是一种运用JavaScript和可扩展标记语言(XML),在网络浏览器和服务器之间传送或接受数据的技术。主要应用于Ria(Rich internet applications)的开发上。 xml问题终于在今天还是解决了。最后在FireFo
- 相关链接:
- 教程说明:
AJAX教程-怎样用DHTML与XML制作Ajax幻灯片
 。
。