如何在Struts 2中实现文件上传_JSP教程
推荐:FCKeditor编辑器在JAVA中的使用与配置方法工作前的准备 版本是FCKeditor_2.4.2.zip【组件的主文件包】,FCKeditor.Java 2.3.zip【这里面提供了标签库和图片上传的jar】。这些都可以在http://www.fckeditor.net 网站下载到! 配置 1. 新建工程compass,在WebRoot文件夹下新建文件夹FCKeditor(用来存
如何在Struts 2中实现文件上传
实现原理
Struts 2是通过Commons FileUpload文件上传。Commons FileUpload通过将HTTP的数据保存到临时文件夹,然后Struts使用fileUpload拦截器将文件绑定到Action的实例中。从而我们就能够以本地文件方式的操作浏览器上传的文件。
具体实现
前段时间Apache发布了Struts 2.0.6 GA,所以本文的实现是以该版本的Struts作为框架的。以下是例子所依赖类包的列表:

清单1 依赖类包的列表
首先,创建文件上传页面FileUpload.jsp,内容如下:
<% @ taglib prefix = " s " uri = " /struts-tags " %>
<! DOCTYPE html PUBLIC "-//W3C//DTD XHTML 1.0 Transitional//EN" "http://www.w3.org/TR/xhtml1/DTD/xhtml1-transitional.dtd" >
< html xmlns ="http://www.w3.org/1999/xhtml" >
< head >
< title > Struts 2 File Upload </ title >
</ head >
< body >
< s:form action ="fileUpload" method ="POST" enctype ="multipart/form-data" >
< s:file name ="myFile" label ="Image File" />
< s:textfield name ="caption" label ="Caption" />
< s:submit />
</ s:form >
</ body >
</ html >
清单2 FileUpload.jsp
在FileUpload.jsp中,先将表单的提交方式设为POST,然后将enctype设为multipart/form-data,这并没有什么特别之处。接下来,<s:file/>标志将文件上传控件绑定到Action的myFile属性。
其次是FileUploadAction.java代码:
package tutorial;
import java.io.BufferedInputStream;
import java.io.BufferedOutputStream;
import java.io.File;
import java.io.FileInputStream;
import java.io.FileOutputStream;
import java.io.InputStream;
import java.io.OutputStream;
import java.util.Date;
import org.apache.struts2.ServletActionContext;
import com.opensymphony.xwork2.ActionSupport;
public class FileUploadAction extends ActionSupport {
private static final long serialVersionUID = 572146812454l ;
private static final int BUFFER_SIZE = 16 * 1024 ;
private File myFile;
private String contentType;
private String fileName;
private String imageFileName;
private String caption;
public void setMyFileContentType(String contentType) {
this .contentType = contentType;
}
public void setMyFileFileName(String fileName) {
this .fileName = fileName;
}
public void setMyFile(File myFile) {
this .myFile = myFile;
}
public String getImageFileName() {
return imageFileName;
}
public String getCaption() {
return caption;
}
public void setCaption(String caption) {
this .caption = caption;
}
private static void copy(File src, File dst) {
try {
InputStream in = null ;
OutputStream out = null ;
try {
in = new BufferedInputStream( new FileInputStream(src), BUFFER_SIZE);
out = new BufferedOutputStream( new FileOutputStream(dst), BUFFER_SIZE);
byte [] buffer = new byte [BUFFER_SIZE];
while (in.read(buffer) > 0 ) {
out.write(buffer);
}
} finally {
if ( null != in) {
in.close();
}
if ( null != out) {
out.close();
}
}
} catch (Exception e) {
e.printStackTrace();
}
}
private static String getExtention(String fileName) {
int pos = fileName.lastIndexOf( " . " );
return fileName.substring(pos);
}
@Override
public String execute() {
imageFileName = new Date().getTime() + getExtention(fileName);
File imageFile = new File(ServletActionContext.getServletContext().getRealPath( " /UploadImages " ) + " / " + imageFileName);
copy(myFile, imageFile);
return SUCCESS;
}
}
清单3 tutorial/FileUploadAction.java
在FileUploadAction中我分别写了setMyFileContentType、setMyFileFileName、setMyFile和setCaption四个Setter方法,后两者很容易明白,分别对应FileUpload.jsp中的<s:file/>和<s:textfield/>标志。但是前两者并没有显式地与任何的页面标志绑定,那么它们的值又是从何而来的呢?其实,<s:file/>标志不仅仅是绑定到myFile,还有myFileContentType(上传文件的MIME类型)和myFileFileName(上传文件的文件名,该文件名不包括文件的路径)。因此,<s:file name="xxx" />对应Action类里面的xxx、xxxContentType和xxxFileName三个属性。
FileUploadAction作用是将浏览器上传的文件拷贝到WEB应用程序的UploadImages文件夹下,新文件的名称是由系统时间与上传文件的后缀组成,该名称将被赋给imageFileName属性,以便上传成功的跳转页面使用。
下面我们就来看看上传成功的页面:
<% @ taglib prefix = " s " uri = " /struts-tags " %>
<! DOCTYPE html PUBLIC "-//W3C//DTD XHTML 1.0 Transitional//EN" "http://www.w3.org/TR/xhtml1/DTD/xhtml1-transitional.dtd" >
< html xmlns ="http://www.w3.org/1999/xhtml" >
< head >
< title > Struts 2 File Upload </ title >
</ head >
< body >
< div style ="padding: 3px; border: solid 1px #cccccc; text-align: center" >
< img src ='UploadImages/<s:property value ="imageFileName" /> ' />
< br />
< s:property value ="caption" />
</ div >
</ body >
</ html >
清单4 ShowUpload.jsp
ShowUpload.jsp获得imageFileName,将其UploadImages组成URL,从而将上传的图像显示出来。
然后是Action的配置文件:
<! DOCTYPE struts PUBLIC
"-//Apache Software Foundation//DTD Struts Configuration 2.0//EN"
"http://struts.apache.org/dtds/struts-2.0.dtd" >
< struts >
< package name ="fileUploadDemo" extends ="struts-default" >
< action name ="fileUpload" class ="tutorial.FileUploadAction" >
< interceptor-ref name ="fileUploadStack" />
< result name ="success" > /ShowUpload.jsp </ result >
</ action >
</ package >
</ struts >
清单5 struts.xml
fileUpload Action显式地应用fileUploadStack的拦截器。
最后是web.xml配置文件:
< web-app id ="WebApp_9" version ="2.4"
xmlns ="http://java.sun.com/xml/ns/j2ee"
xmlns:xsi ="http://www.w3.org/2001/XMLSchema-instance"
xsi:schemaLocation ="http://java.sun.com/xml/ns/j2ee http://java.sun.com/xml/ns/j2ee/web-app_2_4.xsd" >
< display-name > Struts 2 Fileupload </ display-name >
< filter >
< filter-name > struts-cleanup </ filter-name >
< filter-class >
org.apache.struts2.dispatcher.ActionContextCleanUp
</ filter-class >
</ filter >
< filter >
< filter-name > struts2 </ filter-name >
< filter-class >
org.apache.struts2.dispatcher.FilterDispatcher
</ filter-class >
</ filter >
< filter-mapping >
< filter-name > struts-cleanup </ filter-name >
< url-pattern > /* </ url-pattern >
</ filter-mapping >
< filter-mapping >
< filter-name > struts2 </ filter-name >
< url-pattern > /* </ url-pattern >
</ filter-mapping >
< welcome-file-list >
< welcome-file > index.html </ welcome-file >
</ welcome-file-list >
</ web-app >
清单6 WEB-INF/web.xml
发布运行应用程序,在浏览器地址栏中键入:http://localhost:8080/Struts2_Fileupload/FileUpload.jsp,出现图示页面:
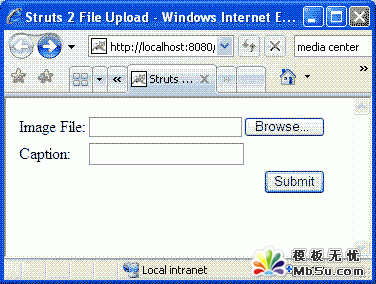
清单7 FileUpload页面
选择图片文件,填写Caption并按下Submit按钮提交,出现图示页面:
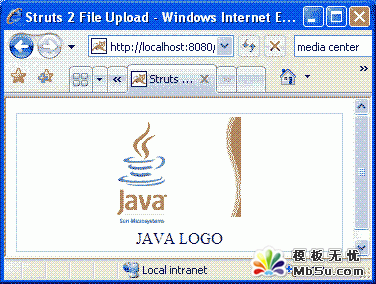
清单8 上传成功页面
更多配置
在运行上述例子,如果您留心一点的话,应该会发现服务器控制台有如下输出:
INF Unable to find 'struts.multipart.saveDir' property setting. Defaulting to javax.servlet.context.tempdir
Mar 20 , 2007 4 : 08 : 43 PM org.apache.struts2.interceptor.FileUploadInterceptor intercept
INF Removing file myFile C:\Program Files\Tomcat 5.5 \work\Catalina\localhost\Struts2_Fileupload\upload_251447c2_1116e355841__7ff7_00000006.tmp
清单9 服务器控制台输出
上述信息告诉我们,struts.multipart.saveDir没有配置。struts.multipart.saveDir用于指定存放临时文件的文件夹,该配置写在struts.properties文件中。例如,如果在struts.properties文件加入如下代码:
清单10 struts配置
这样上传的文件就会临时保存到你根目录下的tmp文件夹中(一般为c:\tmp),如果此文件夹不存在,Struts 2会自动创建一个。
错误处理
上述例子实现的图片上传的功能,所以应该阻止用户上传非图片类型的文件。在Struts 2中如何实现这点呢?其实这也很简单,对上述例子作如下修改即可。
首先修改FileUpload.jsp,在<body>与<s:form>之间加入“<s:fielderror />”,用于在页面上输出错误信息。
然后修改struts.xml文件,将Action fileUpload的定义改为如下所示:
< interceptor-ref name ="fileUpload" >
< param name ="allowedTypes" >
image/bmp,image/png,image/gif,image/jpeg
</ param >
</ interceptor-ref >
< interceptor-ref name ="defaultStack" />
< result name ="input" > /FileUpload.jsp </ result >
< result name ="success" > /ShowUpload.jsp </ result >
</ action >
清单11 修改后的配置文件
显而易见,起作用就是fileUpload拦截器的allowTypes参数。另外,配置还引入defaultStack它会帮我们添加验证等功能,所以在出错之后会跳转到名称为“input”的结果,也即是FileUpload.jsp。
发布运行应用程序,出错时,页面如下图所示:
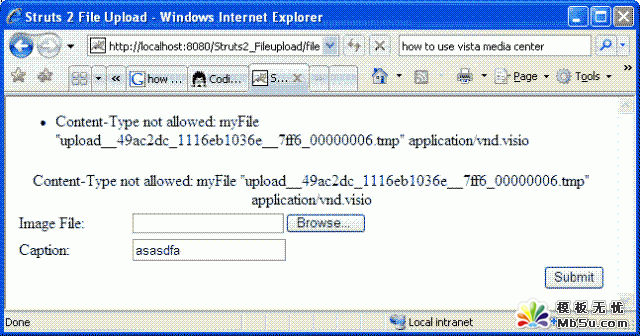
清单12 出错提示页面
上面的出错提示是Struts 2默认的,大多数情况下,我们都需要自定义和国际化这些信息。通过在全局的国际资源文件中加入“struts.messages.error.content.type.not.allowed=The file you uploaded is not a image”,可以实现以上提及的需求。对此有疑问的朋友可以参考我之前的文章《在Struts 2.0中国际化(i18n)您的应用程序》。
实现之后的出错页面如下图所示:
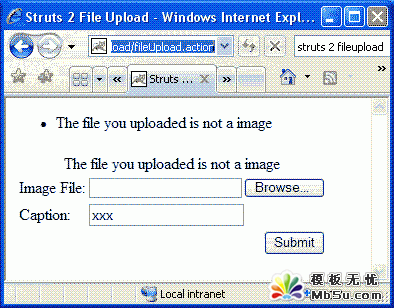
清单13 自定义出错提示页面
同样的做法,你可以使用参数“maximumSize”来限制上传文件的大小,它对应的字符资源名为:“struts.messages.error.file.too.large”。
字符资源“struts.messages.error.uploading”用提示一般的上传出错信息。
多文件上传
与单文件上传相似,Struts 2实现多文件上传也很简单。你可以将多个<s:file />绑定Action的数组或列表。如下例所示。
< s:file label ="File (1)" name ="upload" />
< s:file label ="File (2)" name ="upload" />
< s:file label ="FIle (3)" name ="upload" />
< s:submit />
</ s:form >
清单14 多文件上传JSP代码片段
如果你希望绑定到数组,Action的代码应类似:
private File[] uploads;
private String[] uploadFileNames;
private String[] uploadContentTypes;
public File[] getUpload() { return this .uploads; }
public void setUpload(File[] upload) { this .uploads = upload; }
public String[] getUploadFileName() { return this .uploadFileNames; }
public void setUploadFileName(String[] uploadFileName) { this .uploadFileNames = uploadFileName; }
public String[] getUploadContentType() { return this .uploadContentTypes; }
public void setUploadContentType(String[] uploadContentType) { this .uploadContentTypes = uploadContentType; }
清单15 多文件上传数组绑定Action代码片段
如果你想绑定到列表,则应类似:
private List < File > uploads = new ArrayList < File > ();
private List < String > uploadFileNames = new ArrayList < String > ();
private List < String > uploadContentTypes = new ArrayList < String > ();
public List < File > getUpload() {
return this .uploads;
}
public void setUpload(List < File > uploads) {
this .uploads = uploads;
}
public List < String > getUploadFileName() {
return this .uploadFileNames;
}
public void setUploadFileName(List < String > uploadFileNames) {
this .uploadFileNames = uploadFileNames;
}
public List < String > getUploadContentType() {
return this .uploadContentTypes;
}
public void setUploadContentType(List < String > contentTypes) {
this .uploadContentTypes = contentTypes;
}
清单16 多文件上传列表绑定Action代码片段
总结
在Struts 2中实现文件上传的确是轻而易举,您要做的只是使用<s:file />与Action的属性绑定。这又一次有力地证明了Struts 2的简单易用。
分享:JSP实例:Java实现随机验证码功能实例现在许多系统的注册、登录或者发布信息模块都添加的随机码功能,就是为了避免自动注册程序或者自动发布程序的使用。 验证码实际上就是随机选择一些字符以图片的形式展现在页面上,如果进行提交操作的同时需要将图片上的字符同时提交,如果提交的字符与服务器
- jsp response.sendRedirect不跳转的原因分析及解决
- JSP指令元素(page指令/include指令/taglib指令)复习整理
- JSP脚本元素和注释复习总结示例
- JSP FusionCharts Free显示图表 具体实现
- 网页模板:关于jsp页面使用jstl的异常分析
- JSP页面中文传递参数使用escape编码
- 基于jsp:included的使用与jsp:param乱码的解决方法
- Java Web项目中连接Access数据库的配置方法
- JDBC连接Access数据库的几种方式介绍
- 网站图片路径的问题:绝对路径/虚拟路径
- (jsp/html)网页上嵌入播放器(常用播放器代码整理)
- jsp下显示中文文件名及绝对路径下的图片解决方法
- 相关链接:
- 教程说明:
JSP教程-如何在Struts 2中实现文件上传
 。
。